The photographic year 2010

I haven’t blogged in a while and don’t really feel inclined to post anything too geeky (though I certainly have some topics in the pipeline). So I decided to have a look back at 2010 from a photographic point of view. This includes the shots I took and the stuff I used to do it. Here we go!

Wanderung GrenzroutenBirthday Party

Accessoires

In January I decided to get myself an external flash, a Canon EX 430 II. I didn’t regret this decision a single day since then. No matter how fast your ISO and how wide your aperture, at some point you will most certainly need a flash. If used correctly, flash images look more natural to the casual observer, the fact that a flash was used only becomes apparent after studying the image more closely. Off-camera flash is even more fun, which is why I quickly got myself simple and cheap Tetra Phottix remote triggers.Reflective Umbrella DIYThe next logical and easy step was to play around with so-called “gels” (color filter for artificial lights), which can shift the 5500K light emitted by the flash to different temperatures. The gel I most commonly use is the Roscosun 1/2 CTO (color-to-orange) which shifts 5500K to 3800K, close to most of the artificial light sources you discover. I only used gels exclusively in the latter half of 2010 and the photos turned out much more balanced than before. A key aspect is to allow enough ambient light, otherwise I won’t matter how you shift your flash since it will be the only visible light source. The ‘Av’ or ‘Tv’ (or even ‘M’) modes can be used for that, while ‘P’ will most certainly overpower any background lighting.
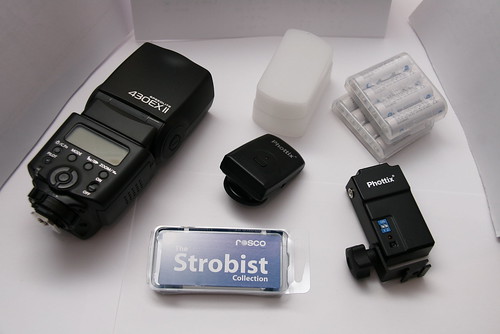
Once you get started with off-camera flash photography there is a whole new world of additional gadgets to be bought and tricks to be learned, just have a look at the Strobist website. Needless to say, driving a single flash can get old really fast. A second flash was the logical next step. Since I knew I was only going to use this second flash in setup situations and off-camera (without a TTL-capable remote triggering system), I went for one of the cheapest and yet most reliable solutions and bought a Yongnuo YN-460 II. This flash only does manual (even on-camera), but it can trigger by itself on flash and even TTL-flash, without the need for any additional trigger mechanism. So I can use this with my EX 430 on-camera, with the EX 430 off-camera (using the Tetra trigger), and even with my builtin flash. I’m happy with the build quality and reliability of the Yongnuo and can only recommend it to any aspiring strobist on a budget.

I got myself a pol filter for my 18-200mm but have yet to really use it :(.

Lens-wise my repertoire grew by another prime lens: The Sigma EX 30mm 1.4. This lens combined the huge aperture of my 50mm with the standard focal width corresponding to 50mm (1.6 * 30mm = 48mm) on full-frame sensors. So far this lens has not let me down quality-wise. The focus works fast, quiet and reliably, the color reproduction is great and the build quality of this lens is solid. Sharpness (even at f1.4) lags in no way behind my 50mm 1.4. I have shot four events exclusively with this lens and was never restricted by the focal length. The typical shot of a couple across the table now becomes natural, while my 50mm always gave me the feeling of having to single out people in order to shot them. Another nice thing about Sigma lenses is that the lens hood is included for all of their lenses. Obviously this lens can’t be used on full-frame, but given the current lineup of crop SLRs, I don’t feel the need to go there anytime soon.

Finally I took a leap of faith and used an alternative “hacked” firmware on my EOS 400D which unlocks some nice features. For me, the most important features were intermediate ISO steps and manual white balance. While the EOS 400D only presents ISO 100-200-400-800-1600, the hacked firmware allows steps in between, like 400-500-640 etc. While quality at 400 is still OK, it can be a little coarse at 800, so going to 500 and 640 first is a nice option. Manual whitebalance means being able to set the temperature, and not use the WB-shift feature or the white-balance on exisiting photo. This feature has taught me a lot about judging lighting conditions and choosing the right gel for my flash. On a side note, I discovered two EXIF tags I had not noticed before: Remaining flash voltage and camera temperature (only Canon).

What’s next

In the never-ending circle of DSLR-upgrades, the next thing for me will most certainly be a new camera body. While I don’t use the maximal resolution, never photograph in RAW and don’t miss movies this much, the ISO speed of the EOS 400D is a serious limitation. I never shoot at 1600 (except for grainy BW photos), while friends of mine use their 550D on 1600 or 3200 in most indoor situations. Since all the new models possess basically the same superior chip, I might go for the 550D, the 60D or the 7D, depending on how much I use my old 400D in the time until then. A nice distraction before the new body will probably an umbrella and lightstand for one of my flashes.

Wanderung GrenzroutenFooling aroundHerbstwanderungMy new Yongnuo 460-II in action ;)

As usual, complete galleries of my shots can be found on http://photos.heipei.net, while flickr only has a few selected shots.

Have a great 2011 ;)

WEP cracking with aircrack-ng

AircrackUp until recently I thought of quickly cracking a WEP-enabled wireless as complicated. I was under the impression that not only special wireless NICs were needed to perform the necessary attack, but furthermore some time, a lot of luck and extensive knowledge of the necessary tools were absolutely necessary. I had seen videos of someone using Kismac to discover a WEP-key in about 10 minutes, but since my Airport Extreme does not support packet injection and I didn’t follow up on it, I quickly forgot about it.
For some reason I delved into the topic again about a month ago. I realized that my tiny and cheap Acer Aspire One 110L, with its Atheros NIC (AR242x, 802.11abg) does in fact possess the ability to inject packets. Out of curiosity I had to try it for myself. This is not meant as a tutorial for cracking WEP (there is a comprehensive guide for aircrack), but rather as an encouragement to try it yourself, or at least to think very hard if you’re still using WEP.

The most shocking thing I discovered was that the number of necessary packets to crack WEP had dramatically decreased with new attack methods. The aircrack-team talks about 20k / 40k packets (with the new PTW attack, origin and paper here) for cracking 64bit/128bit WEP, which is well below the 1000k packets I read about in the past. At a rate of 500 packets/s this amounts to less than 5 minutes of time needed. This is still a lot if you have to depend on legitimate network traffic and don’t have a few days of time. To speed things up, packet re-injection is the way to go today. It works like this: You wait and try to record an ARP-request (which should be no problem if someone is on the network), and then replay this request back to the network, meaning you simply re-inject the same packet you captured. For every ARP-request, the AP/router should respond with an ARP-reply, which in turn is a new data packet and the kind of packet you want to capture in order to get to 20k/40k unique IVs (initialization vectors). Now imagine doing this re-injection at a rate of 500 packets/s and you get the point.

A few caveats:

  • If nobody’s on the network you won’t be able to capture an ARP-request. Tough luck ;)
  • If someone is on the network but you missed their initial ARP you can try disassociating them
  • I wasn’t able to do fake auth with the AP, which is why I had to replay the ARPs as long as the original client was still associated
  • If you wan’t to make extra sure you capture all the interesting replies you can keep Kismac running along airodump-ng
  • I suppose this is illegal in Germany. Oh well, I did it while on vacation ;)

The nice thing about this attack:

  • Really fast (think ‘car’ and ‘battery slowly discharging’)
  • Not much storage needed to capture packets
  • Cracking efficiently possible, even on a laptop
  • If used for malicious purposes, the kind of people still using WEP will be the last to notice a few thousands extra 802.11 packets over a 5-minute span

ALIX 2D13: 2.6.35, LEDs, lighttpd, lmsensors

ALIX 2D13It’s a good thing I waited a few days before releasing my next ALIX-post. I was gonna talk about the leds-alix module and where to download it, but in the meantime 2.6.35 was released and already contains all the necessary code. So, besides this post there is a new config: Linux 2.6.35 vanilla for ALIX 2D13. A few changes to the 2.6.34-config I posted last time:

  • I didn’t choose the Geode GL/GX last time, doh!
  • The kernel is no longer tickless (performs better)
  • Threw out some modular crypto-stuff (which I missed the last time)

There are three front-LEDs on the ALIX board, so nothing fancy. The interesting is that there are predefined triggers for these LEDs in /sys/class/leds/ which will make the LEDs display one of the following: heartbeat = load average (blinking speed), ide-disk (write access to the cf-card), timer, etc. Just try cat trigger to see the possible values. There is also the possibility to trigger on matches from iptables (think: traffic on port 22 ;). However my iptables userland seems to be outdated, so I will have to report about this another time.

LighttpdFurthermore I tried using lighttpd instead of gatling on my fat external drive, and it performed even better, using slightly less CPU. In the kernel I activated the deadline IO-scheduler as default (while keeping CFQ and NOOP as an option), let’s see how that plays out. I’m still not getting more than 9MB/s using Samba, while the CPU is mostly idle and lighty completely saturates the 100MBit link, really annoying.
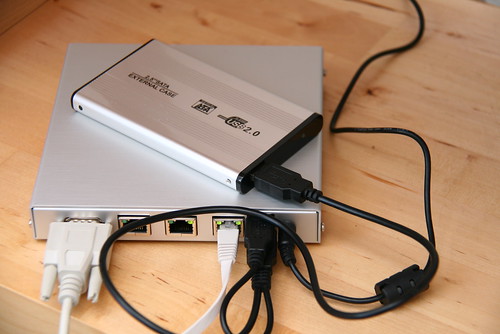
lm_sensors on the ALIX are no problem either. Just try my kernel-config or make sure to activate the basic I2C-stuff and CONFIG_SCx200_ACB. My ALIX runs at comfy 42°C when not under load.

I already talked about using tmpfs for some of the directories written to frequently (/tmp, /var/tmp, /var/run, /var/log, /var/lock). I don’t care about logs right now, so I don’t mind losing them on reboot. Some daemons however complain or won’t start if their log-directories aren’t set up, so you should do that with an init-script. I uploaded my script here, which will work with Debian and also sets up two LEDs and the deadline scheduler in case it isn’t the default.

ALIX 2D13: First impressions

ALIX 2D13I desperately needed a new toy, and found the perfect match with the ALIX 2D13 board from Swiss manufacturer PCEngines. I’ve had good experiences with the WRAP-board more than four years ago, so I knew about the quality of their products. This post should serve as a quick introduction and point out some caveats if you want to setup and use an ALIX 2D13.

Specs

ALIX 2D13PCEngines has an overview over the ALIX-line as well as the specs of the ALIX 2D13, so this is just a short rundown:

  • 500 MHz AMD Geode LX800 (x86)
  • 256 MB DDR DRAM
  • 3 Ethernet NICs (Via VT6105M 10/100)
  • Furthermore: 2x USB ports, MiniPCI-slot, CF-slot, serial port

I chose the 2D13 model since I wanted 3 ethernet NICs and the added battery (for keeping system time after a reboot) seemed like a good idea. The ALIX boards can be bought in many variations, some even providing VGA/sound to be used as a thin client. I ordered my ALIX at the Varia-Store, where they offer a complete bundle of ALIX-2D13-board, enclosure, power supply and CF-card for a mere €145 including shipping in Germany. I ordered on Tuesday at noon and the package arrived Thursday afternoon.

Operating system / prerequisites

You probably want to run Linux on these babies, otherwise you can stop reading ahead. There are some things you really need before you get started:

  • CF-card reader on your computer (for installing the OS to the CF-card)
  • Serial connection (think USB-to-Serial converter, pl2303) to access the ALIX

I chose to install Debian on the ALIX, since I’m familiar with it and it has little overhead. I found these guides to be helpful, even if not completely up to date or correct: Guide 1, Guide 2. But careful! Don’t mount the ALIX board in its enclosure until you’re sure that your ALIX boots, since removing the CF-card requires taking the board out again ;).

The next thing I did was to build a custom kernel, since Debian only includes 2.6.26 and has everything you’ll never need compiled as modules. I built a next-to-minimal kernel on my workstation (this site helped a lot) and it seems to work just fine so far. The config is here. An important thing if you compile somewhere else is to make sure you useARCH=i386 make menuconfig<br /> ARCH=i386 make -j3 when configuring and compiling your kernel for the ALIX.

People already using CF-cards or small embedded devices probably know to use noatime where possible and mount /tmp, /var/tmp, /var/run, /var/log, /var/lock as tmpfs to go easy on the CF-cards limited write cycles.

Performance / Applications

I bought the ALIX to play around with it but also to evaluate its possible use as a Samba-fileserver and CUPS printserver for my flat, and maybe even a small shellserver in case I’m away from home and my workstation isn’t running. With an energy-consumption of about 5-6W you can have it running 24/7, the fact that it doesn’t have any moving parts only adds to that. Booting takes a few seconds by the way, not that it matters.

The first measurements I did were with scp from the ALIX to my WS, which maxed out at 3.5MB/s because OpenSSH used up the CPU on the ALIX. Next I tried using Samba (to and from) and got a mere 6.5MB/s throughput reading from the ALIX and an attached USB-drive. This was with the stock kernel however, and using my own 2.6.34-kernel I was able to transmit more than 9MB/s using Samba. I had a stupid line in my smb.conf which might explain the 6.5MB/s I got before. Make sure to remove this line!:socket options = IPTOS_LOWDELAY TCP_NODELAY SO_RCVBUF=16384 SO_SNDBUF=16384I then did another test using fefes gatling web/ftp/samba-server on the ALIX and my USB-drive in HTTP-mode with wget and was able to completely saturate the 100MBit-link, which is why I suspect to be able to do the same thing with Samba as well.

For customers of Aachens Uni-DSL it should be interesting to know that I managed to max out my 8Mbit-DSL-line (about 700kB/s) using vpnc on the ALIX with enough idle CPU left. Using vpnc and doing a git pull on the ALIX resulted in only a slight slowdown since git was busy saving/packing objects it received. Performance using git daemon on the ALIX and pulling from there were acceptable as well.

All of these measurements are highly unscientific and side-effects or misconfigurations could have had negative effects, so one should read these rates as minimal assurances.

Conclusion

After the first full day of using the ALIX I’m impressed. The CPU is powerful enough for most tasks and with a little custom configuration some things can be sped up considerably. I don’t see any problems for the intended use as a file-server, by whichever way the files are served. The next step will be hooking up my printer.

If you intend to use encrypted filesystems on the ALIX you should do some research first. While the AMD Geode does have hardware support for AES, OpenSSL does not seem to use it and I’m not quite sure about any cryptofs. Another common thing the ALIX might be used for is wireless LAN. The MiniPCI-slot can take a variety of wireless NICs, but I don’t need yet another AP at the moment.

subscribe via RSS